This has happened before for me, and I’m sure it will happen again, and it’s very annoying.
Obviously with a flashing LED on your phone, you don’t want it. Nobody wants something like this. Its main function is to alert a user of attention required, so having it on ALL THE TIME isn’t desired one bit. In fact, I’m sure it would cause many to just go out and get a new phone! I read in some forums how somebody would drill out their LED before they just let it constantly flash at them!
Warnings
The solution to this flashing LED problem is to do a hard reset of the device. Before we do this, however, we must understand a few things.
- After a hard reset, the device is restored to its default settings—the way it was when you first purchased it and turned it on.
- You will lose any programs you installed, data you entered, and settings you customized on your device.
- Your device will be set back to factory default settings.
You should not take those 3 warnings lightly. You will indeed lose all your contacts, txt messages, emails, photographs… EVERYTHING. The device will be restored back to it’s original condition, before you every put your fingers to it.
I will make note here that this procedure was completed on a Windows Mobile platform, and the programs mentioned in here were made for that operating system. If you’re using an Android OS on the HTC TP2, I’ll assume you know your way around good enough to find your own programs to do the operations I mention here.
Preparation / Backup
This in mind, I’m fairly certain you want to backup everything. The program that I use is PIM Backup. It should be free.
It is always advisable to keep your phone plugged in during any system critical operation being performed. This ensures that the battery on the phone will not die mid-operation. This can cause a LOT of problems, none of which you want to deal with. So, KEEP YOUR PHONE PLUGGED IN FOR THE WHOLE PROCEDURE!
Once you download this program, you want to open up ActiveSync and migrate the file to your phone. I always suggest putting these programs onto the memory card in the phone, so that even if you do the hard-reset to the phone, the program – or at least the install file – will be very easily accessible should you want to install it again at a future date.
The prompts on screen are fairly easy to follow, but you’ll want to backup everything on your phone that it allows you – unless you desire differently – which I would also store on the memory card, so that when the phone is hard reset, it won’t be lost either. I always suggest saving a backup file with the date of backup, so you can easily tell which file is most recent.
Hard Reset
Before we go any further, I want to give a bit of advice. Before you go through the trouble of a hard reset, I want to make sure that everything has been done to see if that flashing LED can be turned off.
- Have you tried rebooting the device?
- Have you done a soft reset? Soft reset is done by – when looking at the back of the phone – taking out the stylus and pushing/poking the little red button that is near the top of the side of the phone, nearly in-line with the top edge of the battery (but on the side).

Source: http://www.hardreset.eu/htc_touch_pro_2_rhodium_hard_reset_soft_reset_en.html
Note: I would advise, after the backup has been done, to remove the memory card from the phone (this is found on the opposite side from the soft reset button). This just double makes sure that it will not be erased in the hard reset. The last thing you want to happen is something silly like that to mess everything up.
The actual hard reset is fairly simple to do.
- Turn off the device (and remove memory card)
- Hold down the send/call, end/hangup, and power buttons at the same time.
- This should first boot a multi-colored bios screen, then you will see:
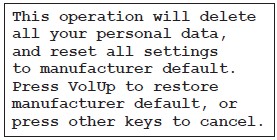
Source: http://www.hardreset.eu/htc_touch_pro_2_rhodium_hard_reset_soft_reset_en.html
- At this time you can release the buttons.
- The VolUp key can be found on the left side – when looking at the front of the phone.
Restoration
Now that the reset it done, it may prompt you to press the VolUp key again to confirm that the operation has been completed. The Hard Reset operation shouldn’t take that long.
The cleaned phone will now reboot, and go through some funny/not normal steps, but have patience and allow it a few minutes to fully boot up.
Once it has fully booted up, it’s smart to now restore all your contacts, txt messages, phone history, etc. that you backed up in the first step with PIM Backup. To do this:
- Browse to the PIM Backup file – which should be on your storage card – using Total Commander is one option for easy file browsing, and launch the program.
- For me, PIM Backup runs automatically from my storage card
- From the drop down menu select Restore this time, instead of backup.
- Browse to the file I wish to backup – which should be saved by date, done in the backup section of this tutorial.
- The on screen prompts are now fairly intuitive, I generally restore everything, using the defaults it suggests. This will remove all information in there and restore it with the information that you’ve backed up, essentially restoring all that information to the state it was at before you did the hard reset.
Note: If you txt a lot, this may take a long time, so be patient. It took over an hour for me.
Note 2: If you attempt to restore emails to an inbox that hasn’t been created yet (ie. you haven’t set up the emails on the reset phone yet) there will be errors in the restoration. Since I always connect to my emails using IMAP, I just avoid this all together and don’t backup or restore emails.
Once this is all done, you should see all your contacts and messages back into their folders, and, most importantly, you shouldn’t see a flashing LED anymore!!
Hope this helps!
Thanks to hardreset.eu for their images, procedures, and tips, on how to do the hard and soft resets for the HTC TP2.