After a photoshoot, the client always likes to see the images taken. It all depends on you, the photographer, how you will give them to the client, but one way is to make a contact sheet. This is typically a *.pdf of all the images in the shoot, in a small thumbnail size on multiple pages. For example, a shoot I just did with 150 images took up 8 pages using the standard 4 x 5 layout.
The Process
The following is what I’m using for this tutorial:
Operating System: Windows 7
Program: Adobe Lightroom 4
To create the contact sheet using Lightroom, the following must be done.
- Open Lightroom and import the images you’d like to make a contact sheet of
- Once imported, and after the necessary file naming and meta-information has been changed, ensure you’re in the Library tab – top right – and select the images you would like to add to the contact sheet. If you’re planning on adding all the images in a folder, this is as quick as pressing ctrl+A, or selecting the first image then scrolling to the bottom and while holding the shift key click on the last image.
- Now click on the Print tab – top right.

Lightroom Print
- On the left hand menu, you can see the different display options. I most commonly use the 4 x 5 Contact Sheet, as I find it’s large enough to view for the client to see what is actually in the image without a magnifying glass. If you click through the different styles, you can see the preview in the top left window of what the layout will look like.

Lightroom template browser
- On the right menu, scroll through the options to change what you see fit. I have found for myself that if I do any changes to Print Sharpening my *.pdf exports are all funky. I also print to the printer, not to an image. It took me a while to sort this out. First I was getting a very highly saturated export, then I was getting only the first 4 images on each page of the contact sheet.
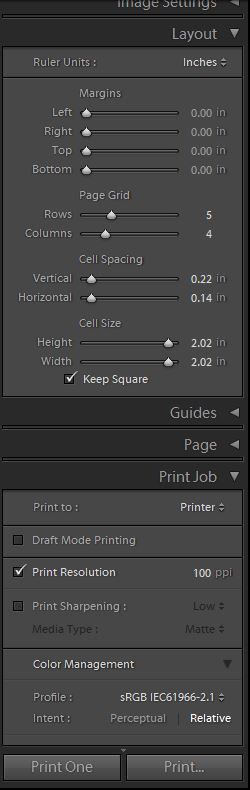
Lightroom Layout Settings
- Once you have everything together and sorted, click the print button and Lightroom will prompt you where to save the file, to name it, and export to a *.pdf document.
Hopefully this helps you!
I already have all images in Lightroom.
I want to review all my SD cards Print fingernails and keep with the chip.
But I cannot print from the import window because I do not want to save them again.
James, so you want to see the contact sheet of the images on your SD card without importing them?
Yes Otherwise I have duplicate images. I am just doing a clean up and cataloging my SD cards and glue the chips to the 20 images typical for that SD.
I’ve never attempted to do this, nor do I understand why you’re keeping images on your SD memory card. A typical (and most reliable) process flow for keeping your images, is to import them from your memory card onto either a local hard drive (local to computer) or external hard drive attached to the computer. This import can either be done via. Lightroom, or just browsing (using explorer) to the memory card, and copying all the files to their proper folder on your hard drive.
Keeping all your images on your SD memory card, no matter how big it is, is a bad practice. Those things are small, flimsy, and it’s very easy to lose them.
I may not be understanding your question properly, forgive me if that’s the case.
How do you make a contact sheet in Lightroom 2020?
I would have expected it to be much the same Jocelyn. Unfortunately I don’t have 2020 installed, so I cannot run this. On Youtube, I have found this video that should help explain the differences -> https://www.youtube.com/watch?v=eSrgKXMgDsg