Creating a bootable USB Flash Drive will allow the techy to install an operating system from a USB stick. Traditionally, this has been the job of a CD or DVD, and before that was the 3.5″ floppys, and before that, oh, before that was the 5.25″ floppy… Remember those days when it took 7 floppys to install an operating system?
Creating this bootable USB drive gives me the ability to walk up to any computer or pc with a USB port, regardless of whether it has a DVD/CD drive or not, and give the computer a fresh operating system install. If you’re just looking to create a autorun USB drive, head to that log.
This is even more handy now that some netbooks and laptops are not even coming with DVD/CD drives.
note: another method for creating a Bootable USB drive using diskpart and command prompt can be found here.
Supplies required.
- Computer with USB port capable of the OS you’re planning on installing
- USB Flash drive with enough space to hold the entire image on
- Operating System *.iso file. This can typically be downloaded from the manufacturers website, and will have the extension *.iso [aka. image file].
- Windows USB/DVD Download Tool [free][this will run on XP as well]
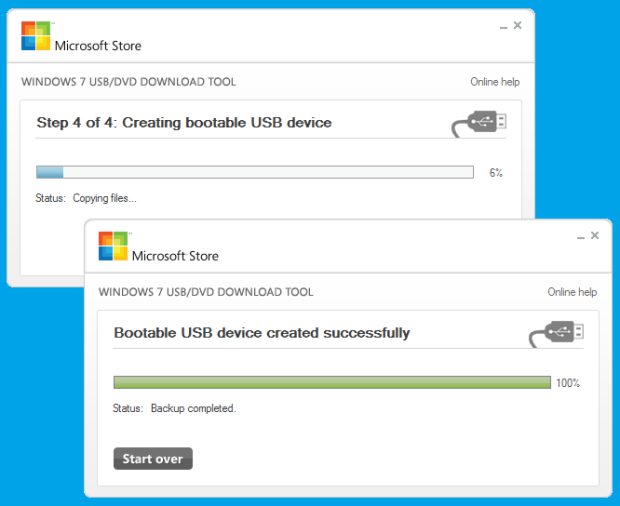
Photo source: Tech Republic
Creating bootable USB flash drive.
- Install the Windows 7 USB/DVD Download Tool [This tool will do everything for you basically, from which image you want to use as source image, to the destination drive, to formatting the USB stick properly to be bootable, so you need it.]
- Once the program has installed, insert your USB stick. This, of course, could have been done before installing the program.
NOTE: Make sure this USB stick/flash drive has enough space on it to hold the entire image. I wouldn’t go less than 4G.
NOTE2: Make sure there is no important information on the USB stick, for it will be formatted and you’ll lose everything on the USB stick. - Run Windows 7 USB/DVD Download Tool. It should have the same layout as the image above.
- Step 1: Choose ISO File. This is the operating system image file, with the *.iso file extension. Most likely this was got downloaded from the manufacturer.
- Step 2: Choose media type. There are two choices here: USB device or DVD. If you really want to create a DVD then go for it, but the whole convenience of this tutorial, is that we can migrate from DVDs, towards USB drives. I would choose USB Device if I was you!
- Step 3: Insert USB Device. You may have to click refresh beside the USB device you’re wanting to format. Make sure that you have the right drive selected. The easiest way to identify this is to open My Computer, and cross reference which drive corresponds to what USB stick inserted, if you have more than one in the computer. You don’t want to mess up this step or you’ll lose all your data off the wrong stick!
- Step 4: Creating bootable USB device. To initiate this step, on the screen for step 3 you click Begin Copying in the bottom right corner. This will take you to a screen similar to what is shown in the image above, where you will watch as the task completes to 100%.
After the status says 100%, you can click the X in the top corner of the application to close it, and remove your USB stick that you’ve freshly formatted. You may want to, before you remove it, to browse the contents of the USB flash drive to see if it looks like a fresh OS install! Also, removing the USB stick, and then inserting it into the computer that just made it should autorun the OS screen, so it should show you a popup screen confirming you made a good disc!
NOTE: When you insert this into a new computer, considering you are making a bootable USB stick, you should make sure that your BIOS is configured properly to allow USB Device to boot, or at least be one of the options. Sometimes, it may just be as easy as pressing either F12, F2, or F8 for the boot menu on startup.
Many thanks to Tech Republic for their great article and photographs for this. If you’re having troubles understanding these methods here, head over there for more step-by step directions. They also cover how to actually install the Windows 7 USB/DVD download tool, how to actually ensure your computer BIOS is set up to boot your USB device first, and the first stages of installing a new OS.
Pingback: Creating an AutoRun USB Flash Drive « Application & Program Tips « Electronic Services
Pingback: Creating a Bootable USB Drive « Application & Program Tips « Teition Solutions