Engine: WordPress
Plugin: WooCommerce
Theme: Mystyle
I am fairly certain the blurry thumbnails I was experiencing on my WordPress website was theme related. But regardless, the issue is one that can occur on various themes and installations so I’m going to go over a few steps that I use to resolve this issue.
The Problem
I had setup an ecommerce store and started to add products to the store, but when I was viewing the store’s home page, and even on each product page, the thumbnails that were showing were all blurry. However, once I was on the product page and clicked on the image to popout the product image, the image showed as clear as ever.
The Solutions
To identify where my problem was, I went through a few steps which I’ll outline for you to read here.
- AJAX Thumbnail Rebuild plugin. Naturally I tried to rebuild all the thumbnails in case there was some kind of weird thumbnail problem when I was uploading the images and WordPress resized them.
- The next thing I did was to go into my theme options and change the thumbnails it was using for it’s images, and then running the AJAX Thumbnail Rebuilder again with this new size.
- This lead me to understand that my theme was displaying the images at a resolution that wasn’t the proper resolution. So, my thumbnail was at 150 px x 150 px, and my theme was displaying them at 200 px x 200 px. (or something like that).By right clicking on the blurry image (in Firefox with Firebug installed) and selecting Inspect element with Firebug. By doing this, one can view the layout or box model of the inspected element, and in doing this I was able to see that indeed, my theme was trying to display it at a weird size that the thumbnail was not. Understanding this, I then identified the style.css element that was causing this discrepancy.
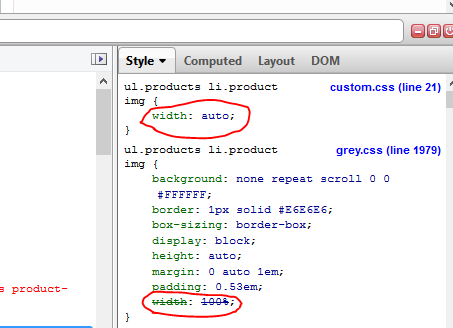
As you can see in the image above, I have circled the lower style that identified a width: 100%, which I override with width: auto (shown above).
This finally solved my problem and everything was crystal clear. I added this custom style into my custom.css style sheet, found in Appearance -> Editor -> custom.css. Each theme is different and some might even have a dashboard item Appearance -> Edit CSS that you should add the customization to.
To be exactly clear, I added the following code to the custom.css file:
ul.products li.product img {width: auto;}
note: in the image above customization was done in a different file than the themes style sheet. You’ll notice that the lower style was written in grey.css style sheet on line 1979, whereas the upper style was written into custom.css on line 21. It is very good practice to do all changes to a WordPress theme in a separate css file specifically for overriding the default theme styles. This ensures that when the theme is upgraded, you don’t loose all the customization you’ve already done. Typically this special customizing style sheet is identified either within the Appearance dashboard menu items, or within the Appearance -> Editor files.
Hope this helps! Perhaps you’ve another theme and have found another solution?
The following forums were helpful: