Browser: Firefox
As a web designer, being able to identify style elements on a theme is essential for doing any kind of style changes for a CSS based website.
CSS = Cascaded Style Sheets
CSS Overview
Let me step back a few seconds to give a quick description of what CSS actually does.
Think of your website as an arrangement of boxes. CSS is the tool you use to arrange those boxes however you like (think position on your monitor within your browser). It is also the tool you use to style those boxes however you like (think fonts, margins, transparency, decoration, background, etc).
Aside: When CSS was just starting out, there were websites you could submit your CSS sheets/designs to that would display your unique style for a standard website. Kind of like a competition for designers to display their creativeness using standard supplies.
Identifying CSS Elements
Firefox comes built in with some developer tools. To use the Firefox Inspector:
- highlight the text you wish to identify
- right click on the highlighted text
- select Inspect Element
This will open up a window at the bottom of your screen showing you a whole lot of code and style elements. It will look something like this (make sure Inspector tab is selected, which should be since you highlighted the text you wished to identify).
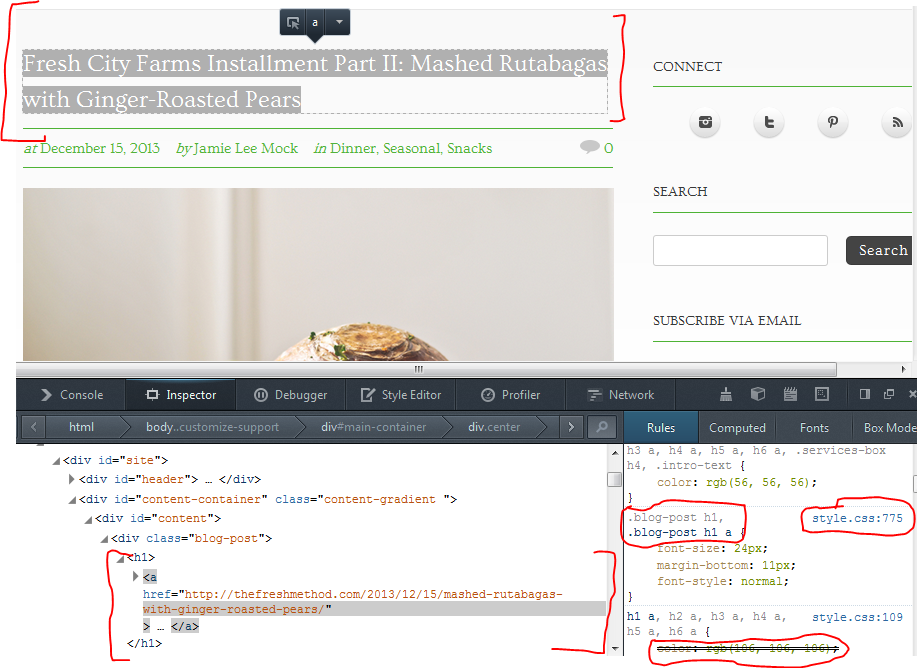
I’d like to identify a few things here now.
First, notice the selected text at the top of the above image (the blog post title) “Fresh City Farms Installment Part II: Mashed Rutabagas with Ginger-Roasted Pears”. You can see the style elements of this selection below in the Inspector. This shows you how the selection is classified and arranged within the code (very similar to right clicking on a website and selecting view page source). Here we see the order of:
- id=”content-container”
- id=”content”
- class=”blog-post”
- <h1>
- <a href…>
The Inspector therefore helps you quickly identify the Rules that control how the selected text is displayed. For this selection of code, you can see on the right hand side of the Inspector:
.blog-post h1, .blog-post h1 a { …
which controls the font-size, margin-bottom, and font-style. You can also see what line within the file style.css this specific CSS element can be found on (775).
Also, note below this element in the Rules how the next style element is crossed out. This means that the CSS style applied is overruled by another id or class.
Changing the CSS
Once you’ve identified what CSS properties rule over the selected code (are active), it’s time to alter that code to your desires.
Within your website, find the style.css style sheet. We know this is the stylesheet name because above, you can see it identified by style.css within the Rules window.
Make the changes you desire right in the style.css file, save, and refresh your browser window with the website page you’re making changes to (or with the elements your changing on it) and you should see it live!
WordPress
In WordPress, one can change elements of their CSS page right in the backend of the engine. This is convenient but hinders the undo feature one can find in regular code editors.
To edit the CSS in WordPress, on the dashboard go to:
- Appearance -> Editor
- From the right menu, select style.css (note: it is usually the default file open to be edited)
- Find the desired style: ctrl+f -> type: .blog-post h1 a (for this example)
- Alter the element as desired
- Click save
- Ensure changes worked

Notes and Warnings
I advise the designer to make one change at a time, and if that change doesn’t get reflected on the page being changed, change it back to what it was originally (ie. make changes, save changes, refresh open window with web content, observe changes). If 5 elements are changed, and only 3 of them work as hoped, but the other 2 change things you don’t at first identify but see later, it can become a headache to go back and find those elements to change back to the original, if you can even remember what the original element value was.
If your changes don’t work, chances are you’re changing the wrong class/id elements (ie. .blog-post h1 a). Elements take on a hierarchy, so the style elements closer to the actual content usually have full override over other elements. In this case, a is the closest element, followed by h1, followed by .blog-post. This can be observed in the nestled structure within the Inspector showing the code.
The internet is full of helpful CSS element options. Google and you’ll find examples of acceptable code, and more advanced tutorials.
Hope this helps the budding coder/designer in you!
Sources: